It seems to me that a lot of people’s opinions1 about large language models and their abilities haven’t been updated since… ooh about 2023. Back then, the frontier models were rough at best. I remember playing around with early ChatGPT and reading funny stories of its spectacular misses, and for a while I was fully on board with the anti-hype of commentators like Ed Zitron.
However, over the last two years my thinking has evolved quite a lot. I’ve become—if not an AI mega-booster—much more appreciative of its utility. This isn’t because, per Zitron, companies like OpenAI and Anthropic are just throwing more and more GPUs at the problem and hoping for the best. Open-weight models that can be run on consumer hardware have also been improving in leaps and bounds, and it’s not actually that difficult or expensive to get started.
Here, tentatively the first of a three-part series, I’ll describe the basic setup of my bargain-basement AI rig, which would come up to about $500 if I’d purchased everything from scratch. But remember: the word of the day is “bodge”.
In contemporary British English slang, bodging can also refer to a job done of necessity using whatever tools and materials come to hand and which, whilst not necessarily elegant, is nevertheless serviceable.
Hardware
GPU
The graphics card is the critical component, and to get anywhere you really need as much VRAM as possible. If you ask the enthusiast community at /r/localllama, they’d say anything less than an Nvidia RTX 3090 is “useless”. The trouble with enthusiast communities, though, is that they’re full of snobs. I don’t just accept the bodge, I relish it. And here I wanted to find the absolute minimum I could get away with. As it turns out, it’s this:
What a beautiful rectangle. Photo from Core4 Solutions on eBay, where I got mine
This is an AMD Radeon Pro v340L, the unholy union of two Vega 10 XL chips on one board. It is “obsolete”. As a server card, it doesn’t have built-in video output or fans—more on that later. But it does have a total of 16GB VRAM, and it sellssold on eBay for fifty dollars. As far as I can tell, this iswas the best value VRAM you’re you were likely to find anywhere.
While editing in November 2026, I discovered that the v340Ls have all sold out! However, the closely related AMD Radeon Instinct MI25 is still available. I won’t bother to add a picture—it looks exactly the same.
The MI25 is a little more expensive at $75, but all 16GB of VRAM is attached to a single Vega 10 XL chip. A couple of months ago I ended up getting one of those too. I’ll really get into the weeds in a future update, but it turns out there are substantial differences in how it performs. In short: slightly slower prompt processing (prefill) but much faster token generation. Even if any v340Ls were still available, I’d probably recommend going for an MI25.
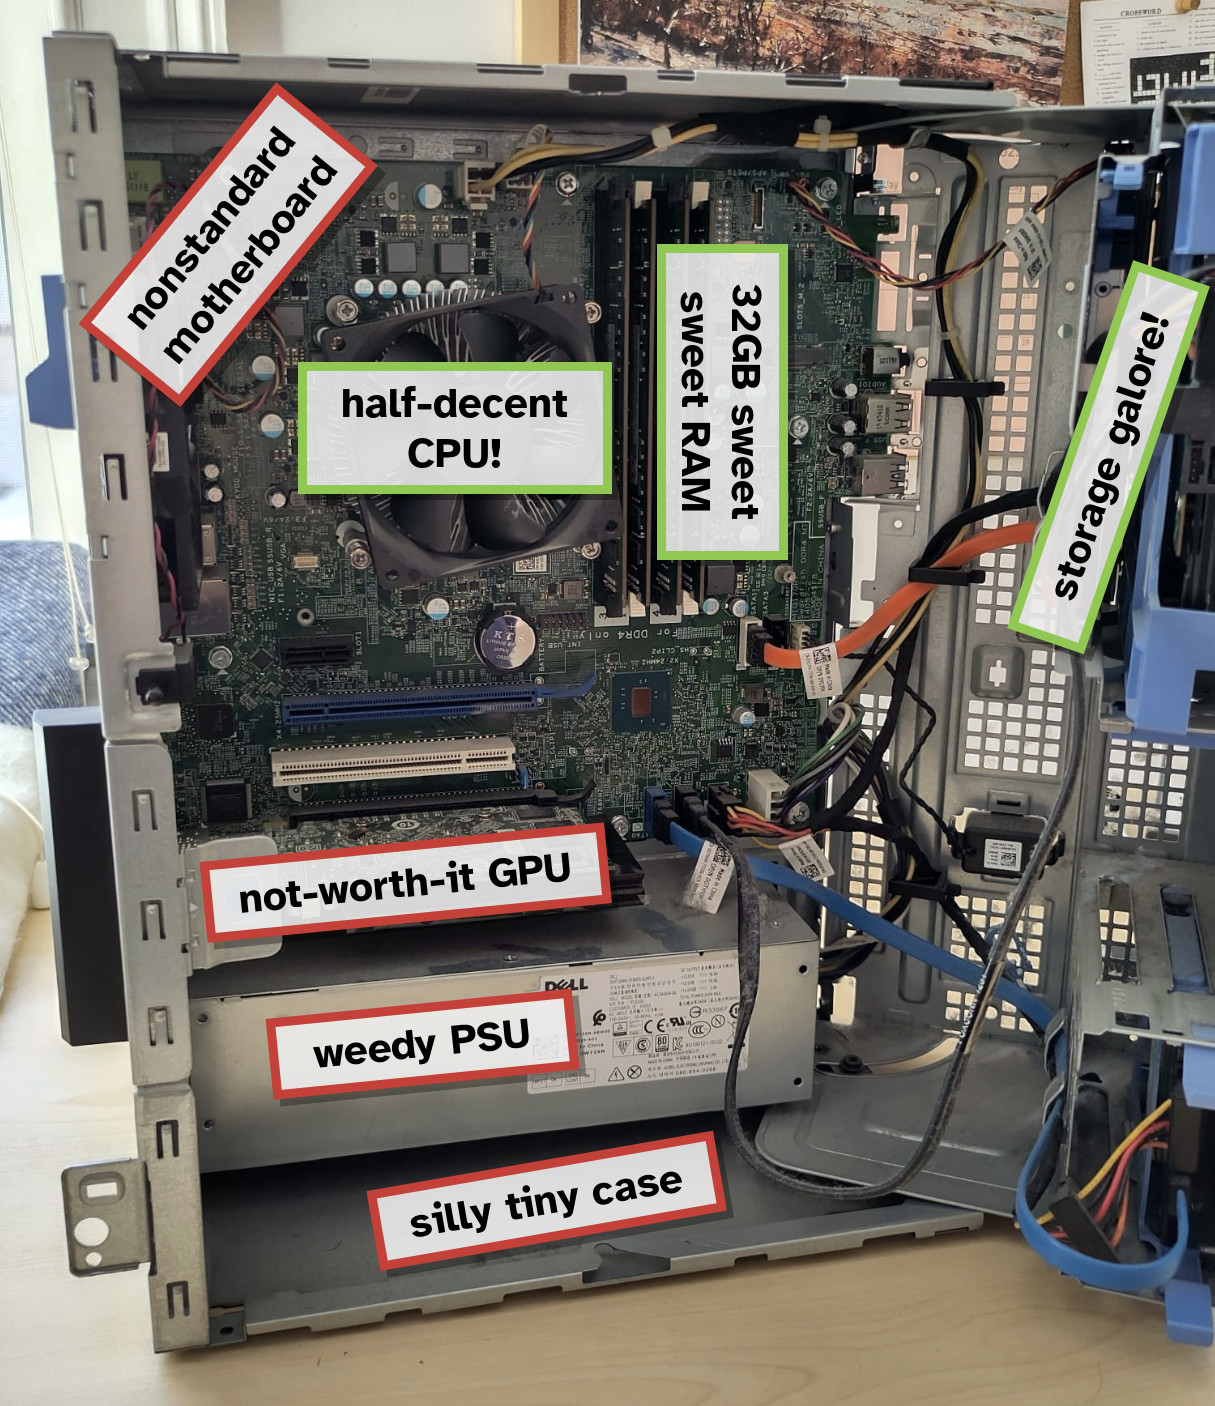
A graphics card alone does not a computer make… but I lucked out thanks to Windows 11’s absurd hardware requirements. The old Dell Optiplex 7040 at my desk at Northeastern couldn’t be upgraded and was about to go to a farm upstate, so after asking nicely I got my grubby mitts on it instead. This set me up with the CPU, 32GB RAM, and a 1TB SSD (and another 1TB hard drive in case I need the room) for the low low price of $0.
If you aren’t able to steal computers from your job, a lazy eBay search throws up the following low-end prices. If you’re bodging an AI rig together outside the US, your results may vary.
Anyway, it fascinates me how capable 10-year-old hardware is still these days. Back in the golden days of the 00s it felt like the newest hardware would only last a couple of years before starting to struggle with the demands of updated software. Same goes for phones: I’ve been using the same one for 6 years now with no signs of slowing down. And you know what? I think that’s great.2
What’s not great is the free desktop’s teeny tiny case, which wouldn’t fit the graphics card’s chonky dimensions, and Dell’s stupid proprietary power supply, which couldn’t fit the card’s thorsty power requirements.
Apologies to my colourblind readers: the good things are green and the bad things are red.
Motherboard/PSU/case
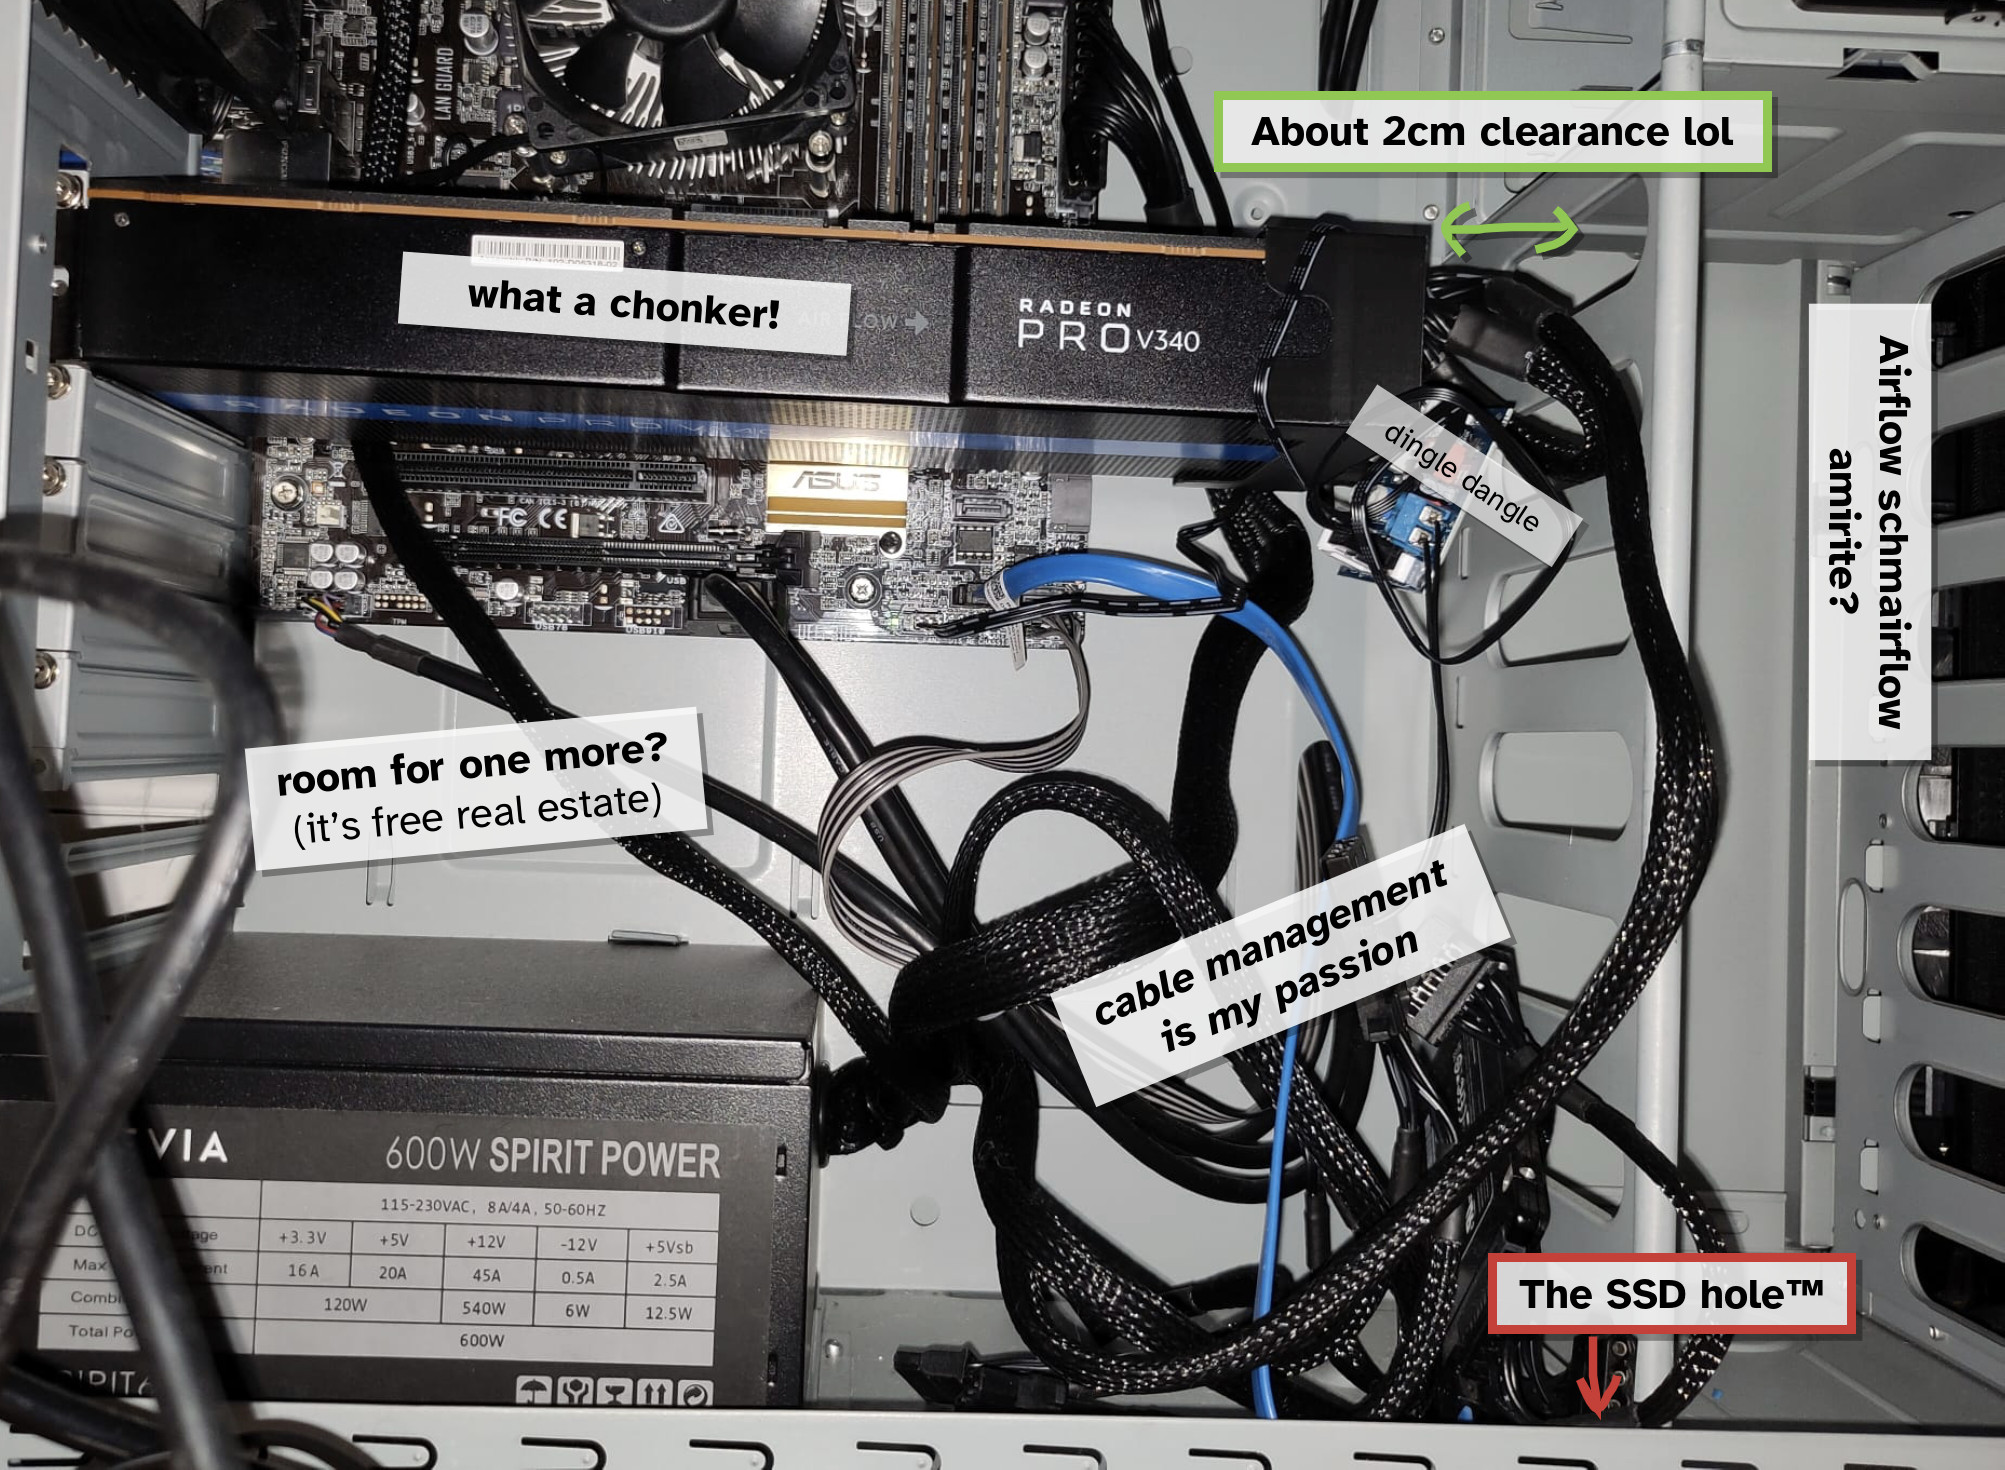
No thanks to Dell then, I had to get a new (used) home-server sized case, a new (used) ATX motherboard and a new (actually new) PSU. Even then, the card just baaarely fit, with a lot of grunting and swearing.
So much room for activities!
The case itself was another eBay find from a very conveniently located seller in Boston, so I saved a lot on postage. On the other hand I did spend $4.80 on the T to fetch it, so who’s to say whether cities are good or bad?3
The motherboard, an ASUS B150M-C, did need some BIOS tweaks before the GPU registered as a PCIe device, specifically:
Disabling “CSM”
Enabling “Above 4G Decoding”
This does require having a monitor and a keyboard handy so you can spam a key like Del or F12 or whatever the ASUS one is during boot to get to the BIOS menu. It really doesn’t need to be fancy—I did it with a 4-inch LCD panel I had lying around.
This motherboard does have one more free PCIe slot, and with a PCIe riser cable—to get around those pesky SATA cables and things—it’s possible to squeeze in a second chonky GPU. If taking advantage of this, you need to size your power supply accordingly.4
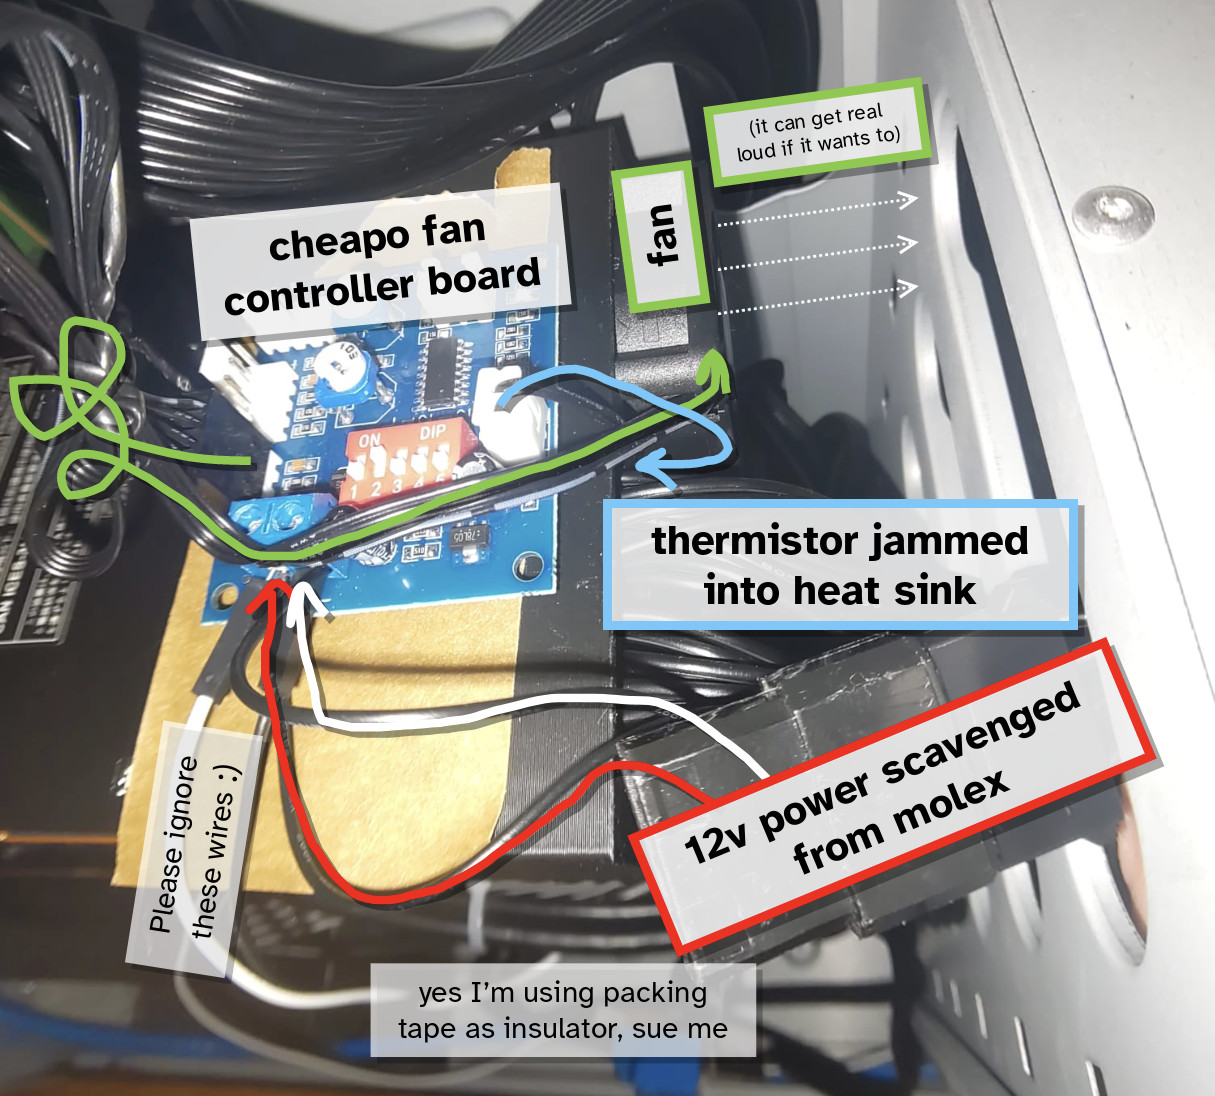
Because of the “no built-in cooling” thing, we need to bodge something together. One enterprising fellow on eBay sells 3D-printed shrouds that will slide over the end of the card and fit a 40mm fan (if you have your own printer it shouldn’t be too difficult to make your own either).
Warning—there is an option to buy the shroud with a fan included. Don’t do it! The fan has a fixed, extremely loud speed setting. Instead, get something like an Arctic S4028-15K pulse-width modulated (PWM) fan which, yes, is also very loud at the highest speed but also can be paired with a speed controller board. These are extremely cheap, and work well enough with the temperature-sensing thermistor shoved into the GPU’s heat sink near the fan. For testing, a very handy piece of software to monitor GPU temperatures on Linux is LACT.
Nothing fancy here for the operating system, I just used bog-standard, vanilla Ubuntu 24.04 for the stability and long-term support. 26.04 should also work but I haven’t tested it (and every upgrade breaks something so I’m not too keen to just yet).
I knew I would be constrained to Linux, so this was part of the reason for opting for AMD graphics cards: they’re much more reliably supported than Nvidia. Even so, despite the card being identified by the OS without issue via the lspci terminal command, it wasn’t visible to the Vulkan graphics API. Only the integrated CPU graphics showed up when I ran vulkaninfo. Err, that’s a bit of a problem… without ROCm support from AMD (come on, the card’s only 8 years old!) Vulkan is the only option for running LLM inference.
It took so long to troubleshoot this issue, and I focused way too much on boot flags for the amdgpu driver: adding things like amdgpu.dc=0 and amdgpu.cik_support=1 to /etc/default/grub in various combinations. Turns out it wasn’t any of that, but rather a permissions problem.
The key hint came from vulkaninfo | grep amd which threw up the following warning in part of the output:
WARNING: [../src/amd/vulkan/radv_physical_device.c:2153] Code 0 : Could not open device /dev/dri/renderD128: Permission denied (VK_ERROR_INCOMPATIBLE_DRIVER)
Digging around a few threads, it seemed like some people had success after changing the permissions for that device. Lo and behold, after chmod 666 /dev/dri/renderD128 the card was suddenly visible to Vulkan! However, this fix didn’t stick around after restarting.
It’s all down to groups. The output from ls -l /dev/dri is:
total 0drwxr-xr-x 2 root root 80 Feb 28 11:20 by-path
crw-rw----+ 1 root video 226, 0 Feb 28 11:20 card0
crw-rw----+ 1 root render 226, 128 Feb 28 11:20 renderD128
This shows that card0 is owned by the user group video and renderD128 is owned by the group render. Adding my login user to these groups fixed the permissions error for good.
sudo usermod -a -G video,render <YOUR_USERNAME>
Obviously in Linux nothing can be too simple, so there are also kernel issues that need to be navigated in some configurations.
On kernel version 6.17.0:
V340L works with no kernel tweaks,
MI25 requires kernel parameter pci=realloc,nocrs to be added to the boot configuration in /etc/default/grub at the line GRUB_CMDLINE_LINUX_DEFAULT,
Using both in a dual-card setup requires the same.
On kernel version 7.0.0:
V340L & dual-card doesn’t work at all, even with the kernel parameters above.
MI25 works with no kernel tweaks.
I don’t know exactly why this is but it seems related to a feature called SR-IOV, used to split GPUs between virtual machines. To use a V340L or a dual-card setup with kernel >7.0.0 might require a custom kernel built without CONFIG_PCI_IOV but I haven’t tested this yet.
Remote access
One of the reasons I know I’ll never become a true Linux freak is that I can’t stomach using a terminal for everything. Don’t get me wrong, ssh is excellent for managing computers remotely. But sometimes you just want that ooey GUI goodness.
Gnome is supposed to have built-in remote desktop functionality but I just couldn’t get it to work. I didn’t write down any details for this so, sorry, I can’t tell you why! What I do know is that xRDP came to the rescue, and the xRDP easy installer script was super simple and worked first time (detailed instructions are in the link).
This is enough to set you up to remote into the computer from the local network, but I also wanted to be able to do it from anywhere, but without exposing the whole computer to the wider Internet. Tailscale was my saviour this time. It’s free for personal use, can connect all of your devices on a private “tailnet”, and again provides very detailed installation and setup instructions.
Tailscale also helps because the tailnet IP address is always the same for each of your devices, saving you from having to worry about things like setting up static IP addresses in your WiFi router.
LLM inference
Nearly there! Now we just need a platform to be able to play around with LLMs on. In my opinion, you can’t go wrong starting with either LM Studio or Unsloth Desktop. It’s worth playing around with both and seeing what you prefer!
These are easily the most user-friendly, plug-and-play, GUI-based LLM platforms I’ve encountered so far, but they also both have a whole load of functionality waiting for you once you start getting adventurous. I’m sure people have a lot of fun squeezing performance out of llama.cpp on the command line, but I’m a simple man: I have a mouse and want to click it.
Both options also have extremely detailed documentation and a very rapid development cycle, so any instructions I put here will be both A) redundant and B) quickly out-of-date. I trust those who wish to follow in my footsteps (why?) to be able to work things out for themselves.
OK so what now?
We’ve got to the point now where we can tell the machine to make words and it’ll make words. In part two, I’ll cover everything I did to make it actually useful, including:
Web UI and API setup
Power savings with wake-on-lan
What do I actually use this stuff for?
And then in a hypothetical part three I might chat benchmarks and get into more of an explainer of different kinds of model for the non-”enthusiast”5 enthusiast.
Specifically, about 99.9% of Mastodon users, so with this post I risk setting off a category 5 pile-on. My only defence is that somebody would have to read it first. If I am to be accused of being a shill for Big Linear Algebra, so be it. ↩︎
Or maybe it’s just that my expectations have changed. Maybe I’m slowing down in my old age at the same rate as my gadgets. ↩︎
That’s right, surprise urbanist content! And yes, it was the red line. ↩︎
Yes I did do this. But that’s not within the scope of this minimum viable “as cheap as possible” setup. ↩︎


Comments
You can use your Mastodon or other Fediverse account to comment on this post by replying to this thread.
Alternatively, you can reply to this Bluesky thread using a bridged Bluesky account.
Learn how this is implemented here.